Connect Airscope to Wi-Fi#
As a wireless miniscope, Airscope needs to connect to Wi-Fi for wireless control and monitoring.
The computer running the DAQ software and the Airscope should be connected to the same local network. For example, they can be connected to the same Wi-Fi router or the same phone hotspot. It would normally also work if the computer and Airscope are connected to the campus network and placed in the same room.
Configure Wi-Fi Connection#
Airscope reads the config.json file on the SD card to know which Wi-Fi network to connect to. To set it up:
Download the
config.jsonfile and modify thewifi_ssidandwifi_passwordfields.
{
  "wifi_ssid": "Your_WiFi_Name",
  "wifi_password": "Your_WiFi_Password",
  ...
}
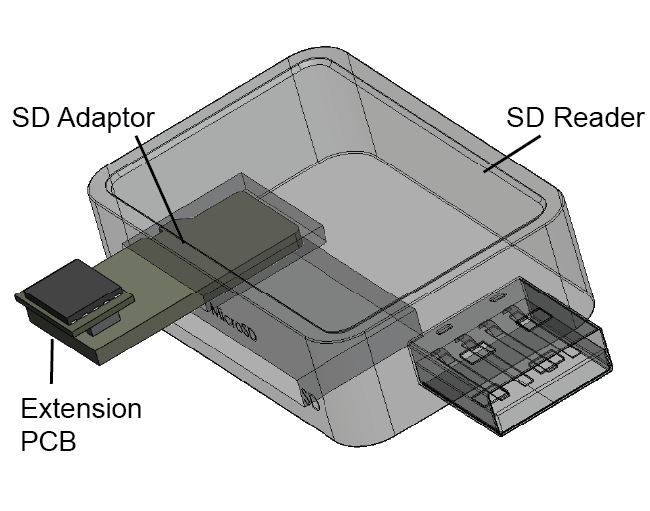
Use the SD adaptor PCB to connect the extension PCB with the SD memory chip to the computer. Copy the file to the root directory of the SD card.
Mount the extension PCB to the Airscope. Airscope will automatically connect to the specified Wi-Fi network at startup.
Connecting to Wi-Fi with MAC Address#
Many institutional networks, such as campus or lab networks, may require a web-based user login to connect to Wi-Fi. In this case, we recommend checking whether the institution provides a network for IoT devices and using the MAC address to register Airscope. Please follow the instructions below to register Airscope to such a network:
In the
config.jsonfile, leave the password blank if it is an open Wi-Fi network:
{
  "wifi_ssid": "YOUR_WIFI_NAME",
  "wifi_password": ""
}
Get the MAC address. When the Airscope program starts, it will generate a
log.txtfile on the SD card containing the device information, including the MAC address at the beginning. Read this file from the SD card and copy the MAC address.Register Airscope in the institutional IoT network registration system.